frank olson music

frank olson music
My Website!

Ribbon Microphone DIY, Make a ribbon mic

Make a Ribbon mic! 

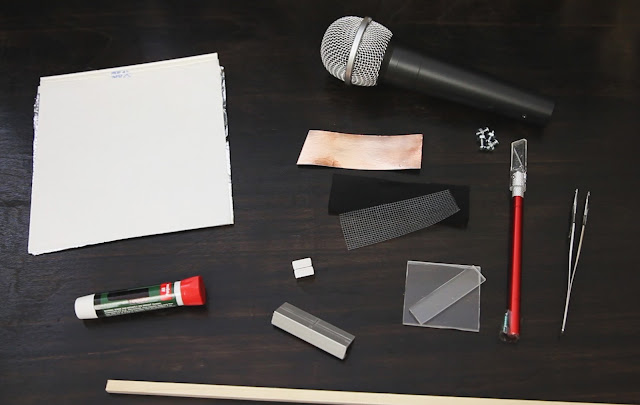
DIY ribbon microphone building is an easy concept: two very strong Neodymium magnets(n42, n48, n52), a motor chassis, a transformer and an aluminum ribbon.  However, there are a myriad of designs online. The best of these are pretty close replicas of popular designs. And really, there's a LOT to consider.

The good news is that most of the research has been done for us by RCA, the BBC, Coles, Harry Olson, etc.... RCA and BBC publications are really easy to find and can give a plethora of great design info.  Even carefully studying photos of old RCA mics can help tremendously.

Some design points to consider:
First and foremost, "What will you primarily record with the mic?"
Magnet thickness, length and strength
Transformer choice
Ribbon length, width, and thickness(these all have large effects on the overall sounds)
Motor chassis material (3d printed, steel, aluminum, acrylic, wood)
Case material
Windscreens
Control screens / Puff sheilds
Screw material(brass/bronze won't accidentally be pulled into your magnets during assembly)
Ribbon corrugator

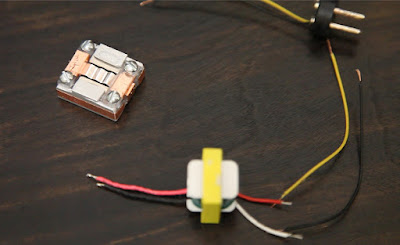
Shown above: The basic parts of your new ribbon mic:  Ribbon Motor, Transformer, XLR connector.

Lots of people start their ribbon mic journey by modding cheap mics.  That's a great way to start, especially if you need practice re-ribboning mics(every bit helps). Most mic builders will quickly outgrow this as it seems really easy to just make your own more powerful microphone.

Many start by making a 1" long ribbon motor.  This is a good starting point for a mic with a nice strong ribbon output. There are lots of great designs throughout history with a 1" ribbon length(approximately).
The one in the video below is about 1/2" long. 


Tips:
My advice is to buy the strongest magnets you can find (n48 and n52), and make sure they are magnetized "Through the thickness."

When you get really good at installing a ribbon, you can cut them to fit VERY closely in the magnet gap.

Steel ribbon motor housing will shield the outside of the mic against attracting other microphones to your new mic(or vice versa).

Ribbon Microphone basic parts to make a DIY Mic
A slightly thicker ribbon is easier to install and is a good compromise between performance and longevity.  About 2 or 3 microns is the industry standard.  Each builder has a preference of thicker and thinner. Most cheap import mics are about 6 microns thick.  They sound dark, but usually take Hi-EQ pretty well without getting really grainy. Sign writer's leaf (gilding leaf) is as thin as .5 micron, though if you sift through it you can find thicker sections.

Aluminum is a very easy metal to make prototypes from.  It takes superglue really well, sands and drills easily, and is a great conductor.

Use a Puff guard on your new mic.  It installs directly in front of your ribbon, and is usually comprised of a perforated steel plate backed with an acoustically transparent gauze.  Also popular is a micro mesh steel. 

Don't Sand your magnets, it's dangerous.  Clean them thoroughly with alcohol and a high quality CA will bond them permanently.

Use a couple pairs of aluminum tweezers to install your ribbons.

Research ribbon corrugations and ribbon corrugators.  Some are better for different designs.  Figure out which style will work best for your mic.

Stretch your ribbons by gently blowing on them and re-tensioning them.  This will do a few things.  1. It will help you get a good sense of how much abuse your handmade ribbons can take.  2.  It will weed out the bad ribbons quickly.  3.  It will keep your ribbons from sagging next year.  4.  It will help give you a good idea what a properly tensioned ribbon looks like.  Blow Gently.

Your DIY ribbon mic can be as elaborate as you want it to be.  Good luck and let me know if you have any questions!

Tascam Portastudio Separte Track Outputs - 414MKII tape Four track Recorder Individual outputs

The most asked question I get on my YouTube channel is "How do I get all four individual tracks from my Tascam 414 into my computer interface?" Usually, the 4 channels are mixed into a stereo pair, and there's no clear way to separate the tracks of the tape.  Well, here's the answer!
Tascam 414MKII Portastudio four track outputs

Basically, the easiest way I've found comes from careful multitrack planning before you start to record.  But, here's the breakdown.

1. You should record the tracks to the individual tracks(1, 2, 3, 4), not the L/R buss.
2. Whatever is on track four should be recorded relatively hot on the Tascam meter.  Not distorted, but a healthy gain going to tape.  Later you won't have any control over how much signal Track 4 is sending to the computer.
3.  Track 3 is similar to track 4, but you'll have a gain knob, so again- Healthy gain, but don't over do it.
4.  Check your panning- it's critical for track one and 2 for track separation with this method.
5.  Sync should be turned off.

So, plan your mic placements and whatever you want to record for each track.  If you're recording a stereo pair, remember which side is which, and neither of those channels should be on track four.


Here's how to hook it all up for recording on the Tascam Portastudio 414mkII:

Track 1 - Pan Left, record as normal
Track 2 - Pan Right, record as normal
Track 3 - Pan doesn't matter, record as normal
Track 4 - Pan doesn't matter, Give a healthy signal that isn't distorting

Now, Playback on the Tascam (through headphones or direct monitoring) will be as normal, however, hooking up to the computer interface complicates things a bit.

Here's how to hook up the Portastudio to your computer interface:

Track 1 - Tascam "Line Out" Left to channel one on your interface.
Track 2 - Tascam "Line Out" Right to channel two on your interface.
Track 3 - Tascam "Effect Send 2" to channel three on your interface.
Track 4 - Tascam "Sync Out" to channel four on your interface.

Now, in your computer:
 Tascam Track 1 (panned left) will be track 1
 Tascam Track 2 (panned right) will be track 2
 Tascam Track 3 Effect Send 2 will be track 3
 Tascam Track 4 Sync Out will be track 4.

Notes:  The level for track three is now controlled by the "Effect Send 2" knob.  Also, you will not have any control of the volume level of track 4.  It sends whatever gain is on the tape.  Experiment to see how much level track 4 needs to give a healthy playback signal- it really shouldn't be much different than the other tracks. You just lose the ability to turn it down.

That's it!  Good luck, and don't forget to subscribe!!


Microphone Mods - Mesh Mods DIY - Restoring your vintage mic to BETTER than NEW Marantz super scope

How to restore and mod a Microphone! Modding mics can be easy!  This Marantz mic was in rough shape and needed some tlc.  I removed the old unnecessary mesh from the inside and cleaned all the electrical points of contact.  This is a very popular mod for most MXL condenser mics.  These mods would apply well to those, too.

First of all, this mic is somewhat interesting to me, because it's a battery powered condenser made by Marantz/Superscope.  It's a small diaphram- but it's not tiny.  I've recorded songs with it before, so I know it has a good overall sound.  But, I know it can sound better.


The first thing I do is disassemble as much as possible, without taking apart the circuit.
Then, I clean every electrical contact point with a high quality cleaner and a cotton swab.
Next, I remove the grill. 
Now, I remove any thin mesh from inside the mic(except for the sides).
Also, I take out the felt guard and micromesh covering the condenser element.  This is designed to help consumers get a long lasting product.  I won't be needing it.
I remove any debris from near the capsule. I'm very careful not to touch the capsule, however.  If there's any dust on your capsule, you could use a very soft camel hair brush to remove it from your element, but there's none here really, so I just move on.
I like to use a contact enhancer called Pro-gold.  It can quiet your entire signal path.  I use it often, and on this mic i used it on every electrical contact point.

Finally, I replace the grill and reassemble .  Time to test the microphone!

Spoiler:  It sounds Great!!

First and foremost, the mic sounds cleaner.  The noise floor is lower and there's added detail in the mids and highs.  Everything sounds tighter.  The mic used to have a bit of hiss and a tiny bit of very low hum.  Both are now gone.

The mesh mod also really helped here.  I took out all the mesh in front of the capsule including the tiny felt dust cap.  If this mic were going to see lots of plosives from people singing or speaking into it, I'd consider leaving some of the micro mesh. But, it won't.

Before the mods, this mic sounded pretty mushy- and kind of boxy.  Now, it's really clear and open(as you can hear in the video!)  There is still a fair amount of low mids, but it's easy to reposition/eq if needed.

The mic also takes high eq a little better.  I can add a bit of sparkle if needed and it works.  Before, adding high end usually accentuated something bad as well..

I hope you liked the video!  And I hope these mod tips helped!

Frank Olson Twins, Now on Patreon! Come join us for perks and limted edition artwork, music, and videos!!

https://www.patreon.com/FrankOlsonMusic

                                                              Become a Patron!
                                                    Click above to become a member!

We're excited to announce we're joining Patreon as part of our effort to create more high quality music and videos!

By becoming a member of our team, you get cool perks like: unique enamel pins, limited edition artwork(original prints and drawings), rare song demos, music video premieres, discounts on merch(CD's, T-shirts), custom mixed tapes, and more!

Click any of the above links and join our team and check out some of the exclusive content we have there!

See you there!
-Frank Olson Twins


*


*


*


*


*


*