Make a Ribbon mic!
DIY ribbon microphone building is an easy concept: two very strong Neodymium magnets(n42, n48, n52), a motor chassis, a transformer and an aluminum ribbon. However, there are a myriad of designs online. The best of these are pretty close replicas of popular designs. And really, there's a LOT to consider.The good news is that most of the research has been done for us by RCA, the BBC, Coles, Harry Olson, etc.... RCA and BBC publications are really easy to find and can give a plethora of great design info. Even carefully studying photos of old RCA mics can help tremendously.
Some design points to consider:
First and foremost, "What will you primarily record with the mic?"
Magnet thickness, length and strength
Transformer choice
Ribbon length, width, and thickness(these all have large effects on the overall sounds)
Motor chassis material (3d printed, steel, aluminum, acrylic, wood)
Case material
Windscreens
Control screens / Puff sheilds
Screw material(brass/bronze won't accidentally be pulled into your magnets during assembly)
Ribbon corrugator
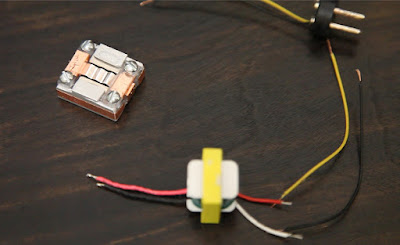
Shown above: The basic parts of your new ribbon mic: Ribbon Motor, Transformer, XLR connector.
Lots of people start their ribbon mic journey by modding cheap mics. That's a great way to start, especially if you need practice re-ribboning mics(every bit helps). Most mic builders will quickly outgrow this as it seems really easy to just make your own more powerful microphone.
Many start by making a 1" long ribbon motor. This is a good starting point for a mic with a nice strong ribbon output. There are lots of great designs throughout history with a 1" ribbon length(approximately).
The one in the video below is about 1/2" long.
Tips:
My advice is to buy the strongest magnets you can find (n48 and n52), and make sure they are magnetized "Through the thickness."
When you get really good at installing a ribbon, you can cut them to fit VERY closely in the magnet gap.
Steel ribbon motor housing will shield the outside of the mic against attracting other microphones to your new mic(or vice versa).
A slightly thicker ribbon is easier to install and is a good compromise between performance and longevity. About 2 or 3 microns is the industry standard. Each builder has a preference of thicker and thinner. Most cheap import mics are about 6 microns thick. They sound dark, but usually take Hi-EQ pretty well without getting really grainy. Sign writer's leaf (gilding leaf) is as thin as .5 micron, though if you sift through it you can find thicker sections.
Aluminum is a very easy metal to make prototypes from. It takes superglue really well, sands and drills easily, and is a great conductor.
Use a Puff guard on your new mic. It installs directly in front of your ribbon, and is usually comprised of a perforated steel plate backed with an acoustically transparent gauze. Also popular is a micro mesh steel.
Don't Sand your magnets, it's dangerous. Clean them thoroughly with alcohol and a high quality CA will bond them permanently.
Use a couple pairs of aluminum tweezers to install your ribbons.
Research ribbon corrugations and ribbon corrugators. Some are better for different designs. Figure out which style will work best for your mic.
Stretch your ribbons by gently blowing on them and re-tensioning them. This will do a few things. 1. It will help you get a good sense of how much abuse your handmade ribbons can take. 2. It will weed out the bad ribbons quickly. 3. It will keep your ribbons from sagging next year. 4. It will help give you a good idea what a properly tensioned ribbon looks like. Blow Gently.
Your DIY ribbon mic can be as elaborate as you want it to be. Good luck and let me know if you have any questions!


what kind of transformer you use?
ReplyDelete